Best Commercial Roofing Materials for Your Property

Nov 25, 2021 | Roofing

Although modern buildings are more durable against the elements than ever before, Mother Nature almost always has the final say. If you don’t design with the elements in mind, the efficiency and durability of your building will decrease. 

This is why it’s important to use the right commercial roofing materials for your climate, whether hot or cold. Fortunately, when it comes to commercial roofing materials, you have lots of options. It’s just a matter of choosing the right one for your property. 

Best Roofing Materials for Hot Climates

The sun and the heat can be incredibly damaging and can also make a significant impact on the energy costs of your building. 

If your property is in a hot climate, here are the best roofing materials you can put on your commercial property.

EDPM

Also known as Thermoset Roof Membrane, or by its full name, ethylene propylene diene monomer, EDPM is a rubber that adheres to your roof and can provide decades of protection against the heat, as well as the destructive qualities of the sun’s UV rays. 

If you get the EDPM in white, it will reflect even more sunlight, helping to keep the building below cooler and reducing your energy consumption from air conditioning. 

The only downsides to EDPM is that it is more expensive than other membrane materials, and it also can be damaged with rocks stuck in shoes, meaning it should not be used on roofs that experience heavy foot traffic.

Metal

Another option for roofing materials in hot climates is metal. Galvanized steel, copper, and aluminum are some of the most common metals, though there are others that will work.. 

Not only are they extremely durable against all the elements, as well as foot traffic, they also reflect sunlight, helping to keep the building cool. The only problem is cost; installing a metal roof is going to be considerably more expensive than a membrane roof. 

Green Roofs

If you want a roof that will keep your property cool and also help out the environment, consider installing a green roof. This could also be a cheaper option, depending on the size of your roof and the availability of rainwater.. 

To do this, you would need to install a membrane roof as the base. Then, you could construct raised garden beds or other structures that would house plants. 

The shade provided by the plants keeps your roof and your building cool, and also protects the material underneath, allowing you to opt for something more affordable, such as a standard modified bitumen roof, rather than a more expensive EPDM roof. 

Best Roofing Materials for Cold Climates

While the heat can certainly be punishing, the cold is just as destructive. If your property lies in an area with lots of snow, ice, and rain, here are the best commercial roofing materials you can use: 
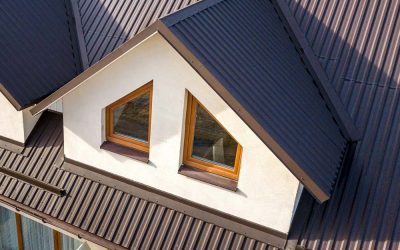
Metal

The best roof you can use in a cold climate is a metal roof with an insulation layer. It will resist the water and cold temperatures better than any membrane roof, meaning you’ll likely never need to replace it. 

Of course, the same issue applies as when you install a metal roof in a hot climate: it’s more expensive. 

Thermoplastic Roof Membrane (PVC)

Made from poly-vinyl chloride (PVC), Thermoplastic Roof Membrane is your next best bet for a roofing material in the cold. It is fully waterproof, and it can also be heat welded, which means it can be applied around odd shapes and structures on your roof. Thi provides a more perfect seal and helps keep moisture out. 

However, over time (usually around 30 years) the membrane will start to lift from the roof and you will need to replace it.  Depending on your plans for the property, it might be worth the savings, though keep this in mind when making your decision.

Slate Tiles

For smaller commercial properties, mainly because of the added material cost, consider slate tiles. The thickness of these tiles, plus their conductive properties, allow them to provide some tremendous insulation against the cold. 

Overall, this will provide considerable energy savings and should be considered despite the initial upfront installation costs. 

Best Roofing Materials for Flat Roofs

Another thing that determines which material is going to be the best for your commercial property’s roof is the shape of the roof itself. Many commercial properties, especially the larger ones, have flat roofs as they are much less expensive to build and also to cover. 

However, flat roofs can cause problems if water does not properly drain. Protect your flat roof by using one of the following materials: 

EDPM

Also the best roofing material for hot climates, EDPM is also the ideal choice for flat roofs. It rolls on and adheres to the roof, providing a thick layer of insulation against the sun and water.

This is the strongest of all the rubber membranes you can install on your commercial property, which means you can expect it to last fifty years or more. But this quality comes with a cost. 

TPO

Another option for flat roofs, one that provides ample protection at a slightly lower cost is Thermoplastic Polyolefin, also known as TPO. 

A relatively new material, TPO applies in a similar way as EDPM, but like PVC, it can also be heat welded, allowing it to be shaped around any roof. And it also provides solid protection against both hot and cold. It can even withstand moderate hail.

Best Roofing Materials for Steep Slope Roofs

The alternative to a flat roof is a steep slope roof. The advantage these roofs provide is that they don’t allow for water, snow, or ice buildup. But the steeper the slope, the harder it is to install certain roofing materials. 

If you have a steep slope roof, then you should use one of the following commercial roofing materials:

Shingles

One of the best materials for steep slope roofs are asphalt shingles, the same ones you find on most residential properties. These are quite durable against the elements and are much easier to apply than a membrane when the roof is sloped. 

The only downside is that asphalt shingles don’t last quite as long as some of the other materials out there. Expect to have to change the roof in 20-30 years depending on the conditions of the area in which the property is located.

Tiles

An alternative to asphalt shingles are tiles, either clay or adobe. They will provide excellent protection against the rain and can also do wonders for insulating your home. And because steep slope roofs tend to have smaller surface areas, you will need fewer materials, helping you cut down costs.

Update Your Commercial Property with a New Roof

There is a big difference between the many different types of commercial roofing materials. Choosing the right one is important to preserving the long-term condition of your property. Whether you live in a hot or cold climate, or have a flat or steep slope roof, there are a lot of decisions to be made. 

Let the experts at Kingdom Roofing help you decide which is right for your needs and budget. Get in touch for a free estimate today.


Talk to us about your commercial project.

Best Commercial Roofing Materials for Your Property

Nov 25, 2021 | Roofing

Dealing with moss on your roof in Indiana? Removing it promptly is essential to prevent damage. Hiring a professional roof inspector for thorough evaluations is crucial to ensure your roof’s condition is properly assessed. If left unattended, moss can trap moisture, leading to structural issues such as loosened shingles, roof leaks, and the growth of damaging organisms like mold and algae. This guide shows you how to get moss off your roof in Indiana effectively and keep it off for good.

Key Takeaways

  • Moss retention on roofs can lead to moisture issues, damaging shingles and compromising the roof’s structural integrity, making early identification and removal essential.
  • The best time to remove moss in Indiana is during spring and summer when growth is easier to manage due to warmer and dryer conditions.
  • Regular maintenance by a roofing contractor, including debris clearance and the installation of prevention measures like zinc strips, is key to preventing future moss growth and ensuring roof longevity.

Why Moss is a Problem for Your Roof

Neglecting the presence of moss might seem inconsequential, yet if not managed, it can inflict considerable harm on your roof. Moss’s propensity to hold onto moisture when in contact with roofing materials is particularly problematic, as it prompts the deterioration of shingles and fosters wood rot over time. This trapped moisture accelerates the degradation process for roofing materials and can threaten the structural soundness of your roof, leading to expensive repair work. As this cycle progresses, moss proliferates, compounding these issues.

The expansion of moss has another detrimental effect. It can pry apart shingles thereby paving avenues through which water may infiltrate causing leaks and additional damage. Its weight adds undue strain to a roof structure that could yield lasting damage if left unchecked. Early detection and remediation are critical in avoiding grave consequences like extensive damages or costly repairs—particularly pertinent when asphalt shingles come into play. A home inspector can identify moss issues during a general assessment, but a dedicated roofing contractor might be necessary for a specialized focus. Additionally, inspecting attics for signs of moss-related damage, such as water stains and wood rot, is crucial.

To overlook moss accumulation spells potential trouble for any rooftop. Conducting regular inspections focused on detecting early signs of growth plays an essential role in preemptively dealing with these threats before they escalate beyond control—a strategy pivotal for circumventing future proliferation that leads to problems down the line while ensuring one’s roof remains intact thus bypassing comprehensive repairs or total replacement woes. Knowing your roof’s condition through these inspections provides crucial insights for budgeting and planning future repairs.

Identifying Moss on Your Roof

To tackle the issue effectively, it’s essential to spot any moss present on your roofing. Moss commonly forms in lush green clumps and favors the shaded, moist spots atop your roof. In contrast to algae that manifests as slick dark lines, roof moss presents itself as soft, dense vegetation frequently nestled into shingle gaps.

It is imperative to perform a thorough inspection of the roof to detect early signs of moss and stave off additional harm. Regular inspections should specifically search for evidence of this growth so that you can address it swiftly. Early detection allows you to implement measures for eradicating the moss and safeguarding your roof’s structure during a home inspection. This may also entail enlisting expertise from a roofing professional to conduct a thorough roof inspection and provide a detailed assessment.

Best Time to Remove Moss in Indiana

The timing of moss removal is essential for its success. In Indiana, the prime seasons to tackle removing moss are spring and summer, with warm and dry climates being ideal. The summer period offers a particular benefit as during this time, moss often enters a dormant state and adheres less firmly to roof shingles, thus simplifying the scraping process.

It’s preferable to undertake moss removal when the weather forecast predicts clear skies since this assists in thoroughly drying out any clean moss remnants, facilitating their complete eradication. Wet conditions can make moss removal more challenging as moss holds moisture against shingles, promoting the growth of damaging organisms and creating slippery conditions.

Selecting just the right moment for eliminating moss plays an instrumental role in sustaining a tidy appearance for your roof—a key factor that contributes substantially to both its durability and overall condition. Engaging a professional roofing contractor can further enhance the effectiveness of moss removal. These experts conduct thorough assessments and provide critical insights into repairs and specialized services, ensuring that your roof remains in optimal condition.

Step-by-Step Guide to Removing Moss for Professionals

The task of moss removal from your roof should ideally be undertaken by a trusted roofing company, particularly when the extent of moss growth is significant. Initially, it’s crucial to evaluate how severe the moss accumulation is on the roof to decide upon an effective method for its eradication. Techniques such as manual scraping, water washing, and chemical applications are commonly employed pressure washing methods for eliminating moss. If the moss damage is extensive, it may necessitate a roof replacement to ensure long-term durability and property value.

Should you feel uneasy about carrying out this process yourself, it’s wise to engage a professional roof cleaning service to guarantee that the job is conducted safely and with precision. Subsequent sections delve into vital preparatory steps required before initiating moss removal on your roof, various hands-on techniques used in manually removing moss, and instructions for applying chemicals designed specifically as a moss killer solution.

Preparing the Roof for Moss Removal

Before initiating the process of moss removal from your roof, it’s essential to adequately prepare the area. Ensure you prioritize safety precautions by utilizing a sturdy ladder equipped with anti-slip features and wearing footwear that offers good traction to mitigate the risk of falling. It is also advisable to wear protective gloves and eyewear for personal protection while removing the moss.

To safeguard your garden or surrounding plants during cleaning, either shield them using plastic tarps or apply a mixture of watered-down dish soap. This will help prevent any harm that might arise from contact with cleaning agents. When ready to begin spraying your roof, do so starting at its peak and working downward. Using the right tools, such as a high-quality sprayer and appropriate cleaning solutions, helps in preserving the integrity of the moss until you commence manual removal, thereby simplifying this part of the task.

Manual Moss Removal Techniques for Professionals

Using appropriate tools is crucial for the manual removal of moss, which includes using brooms and roof rakes specifically designed for this task. For effectively scrubbing moss from your roof without inflicting damage, a stiff brush proves to be an excellent tool. Employing a long-handled brush can enhance safety and efficiency when clearing moss off elevated roofing areas. Professional roofers are often recommended for this task due to their expertise and adherence to safety procedures.

When attempting to clean the moss from your roof tiles, it’s advisable to start at the top and work your way down in order to prevent water infiltration that could lead to leaks. Before beginning the cleaning process with gentle strokes, moisten the targeted sections with water using a garden hose. This will facilitate easier removal of the moss without having to apply excessive force that might harm the shingles. Using gentle techniques is essential to avoid damaging the roofing materials.

The process of manually removing debris may require considerable effort, but remains effective against small cracks if executed cautiously. This meticulous approach serves as an adequate alternative method where cracked methods fail or are not suitable.

Applying Moss Killer Solutions

Utilizing moss killer formulations guarantees the thorough elimination of moss while also deterring its recurrence. Potent cleaning concoctions, like a diluted mixture of bleach and water, are adept at exterminating present moss and thwarting new growth. For effective moss eradication, it is essential to use a moss remover, as it ensures the proper timing and application needed to maximize results. For optimal efficacy, let these mixtures dwell on the affected areas for no less than 20 minutes before washing it off.

It’s crucial to adopt eco-conscious approaches when combating moss to preserve adjacent ecosystems. Administer the anti-moss solution in a descending manner by employing either a spray bottle or pump sprayer. This ensures uniform application and boosts the efficiency of your efforts as you work towards removing moss from surfaces. After applying the solution, addressing the remaining moss is important. Gently wipe off this residual moss using a soft-bristle brush or cloth as part of the final cleanup to ensure a thorough cleaning.

Post-Removal Cleanup

After eliminating the moss, it is essential to engage in an exhaustive cleaning of the removed area. Employ low-pressure water to cleanse the roof and remove any particles of moss that may still be present, thus securing a spotless surface. It’s also crucial to clear away any leftover residue or debris from gutters and downspouts using pressure washing. This action helps avoid blockages that could lead to water damage. Additionally, ensure that all dead moss is completely removed, as it can still retain moisture and cause potential damage.

Subsequent to rinsing off the roof, conduct a detailed inspection for areas where moss might have been overlooked so as to ensure its complete removal. Implementing these measures safeguards your roof’s integrity and deters growth of moss. Regular roofing inspections are also vital after moss removal to maintain the structural integrity and longevity of your roof.

Preventing Future Moss Growth

Preventing future moss growth requires regular roof maintenance and proactive measures to prevent future growth. Here are some steps to consider.

  1. Clear debris and moss remnants from the roof to prevent clogging of gutters and drainage systems.
  2. Regularly clean gutters to ensure proper water flow.
  3. Trim overhanging trees to reduce moisture buildup on your roof, which in turn limits moss growth.

By following these steps, you can effectively manage and prevent moss growth on your roof to rid it of various elements.

Several preventive measures can inhibit moss and algae growth on your roof. Zinc or copper strips can effectively prevent moss growth by creating a hostile environment for moss and algae. Using algae-resistant roofing shingles can also prevent moss growth in humid and damp areas.

By implementing these preventative measures, you can keep your roofs free from unsightly stains and potential water damage. Regular maintenance and proactive steps will help ensure your new roof remains in top condition for years to come and prevent future growth of moss and algae.

When to Call Professional Roofing Contractors

In cases where homeowners are equipped to tackle moss removal by themselves, it might still be advisable to engage expert roofing professionals for the task. This is particularly true when dealing with widespread moss overgrowth on a roof that can be dangerous due to its slippery nature and steep angles. Trained professionals bring specialized equipment and expertise essential for safely conducting these operations while avoiding any additional harm.

Such specialists deliver comprehensive services beyond just eradicating moss—they also handle gutter cleaning, which is instrumental in deterring new accumulations of moss. They apply methods in their roof cleaning processes that are not only effective but also gentle on the environment, ensuring protection for both your home’s top layer and the natural setting around it. Opting for a professional in roofing guarantees meticulous inspections as well as regular upkeep activities designed to extend your roof’s lifespan. Certified home inspectors contribute crucial assessments regarding your roof’s overall state—including determining if there’s an impending necessity for its replacement. Careful handling during these tasks is crucial to avoid causing damage, especially when removing moss or inspecting shingles.

Cost Implications of Moss Removal

Comprehending the financial aspects of moss removal is crucial for planning your maintenance budget. The cost to clean a roof typically varies from $0.20 to $0.35 per square foot, with factors like the degree of moss growth and chosen cleaning techniques influencing the price. For an average-sized roof encompassing 1,500 square feet, you might expect to spend between $300 and $525 on cleaning services. Meanwhile, for larger roofs around 2,000 square feet in size, the standard cost hovers near $440. Addressing potential problems through moss removal is essential to avoid costly repairs and ensure the longevity of your roofing system.

In terms of prevention strategies such as implementing zinc strips on your roof, you can incur expenses ranging from $25 to $50 per 50-foot roll. While this outlay may appear substantial at first glance, it’s considered a sound investment that serves not only to dodge exorbitant future repair bills, but also extends the overall durability of your roofing system. The timing and quality of these preventative measures can make all the difference in achieving effective long-term results and preventing future issues.

Summary

In conclusion, moss removal is a critical aspect of roof maintenance that should not be overlooked. Moss can cause significant damage to your roof, leading to potential leaks and structural issues if left untreated. Maintaining the roof’s integrity by identifying moss early, removing it effectively, and taking preventive measures can help avoid costly repairs and ensure the overall health of your building.

By understanding the best times for moss removal, the steps involved in the process, and when to call professional roofing contractors, you can ensure your roof remains in top condition. Investing in regular maintenance and proactive measures will pay off in the long run, keeping your roof moss-free, enhancing its curb appeal, and extending its lifespan.

Frequently Asked Questions

What are the signs of moss growth on my roof?

Signs of moss growth on your roof include large clumps of moss and dark stains, which can indicate the presence of algae. These are often found in shaded and damp areas or in the cracks and crevices of shingles.

Addressing these issues promptly can help maintain the integrity of your roof.

When is the best time to remove moss from my roof in Indiana?

The best time to remove moss from your roof in Indiana is during spring or summer, as moss continues to grow and retain moisture, leading to significant problems for roofing materials. The warm and dry weather during these seasons enhances the effectiveness of the removal process.

Can I remove moss from my roof myself?

You can remove moss from your roof yourself, but it’s advisable to conduct a roof inspection before attempting DIY moss removal to ensure the roof’s health and identify any underlying issues.

Additionally, avoid using a pressure washer for moss removal, as it can damage roofing materials and merely dislodge the moss rather than completely eliminate it.

How much does it cost to remove moss from a roof?

Removing moss from a roof generally costs between $0.20 and $0.35 per square foot, amounting to approximately $300 to $525 for an average 1,500 square foot roof. Additionally, incorporating roofing inspections into your maintenance routine can help identify potential issues early, ensuring the structural integrity and longevity of your roof.

What preventive measures can I take to avoid future moss growth?

To effectively prevent future moss growth, seek qualified inspectors through the International Association of Certified Home Inspectors® (NACHI) to ensure your roof is properly maintained. Regularly clean your gutters, trim overhanging trees, install zinc or copper strips, and consider using algae-resistant shingles for the protection and longevity of your house.

These measures will significantly reduce the conditions that foster moss growth.

Related Posts

What to Expect During a Roof Inspection in Indiana

What to Expect During a Roof Inspection in Indiana

What is the best siding for my house? This is a question that can be daunting when you are at the life cycle of your current house or a home you are building. There are a couple of main exterior wall product categories and I will break them down in a way that hopefully simplifies their pros and cons plus their price point.

read more