INDIANA’S SAFEST CHOICE FOR ROOFING & SIDING317-674-4900|765-573-5899

Can Exterior Remodels Help Indianapolis Homeowners Lower Insurance Costs?

Oct 27, 2025 | Maintenance

For homeowners in Indianapolis, exterior remodeling has always been about protecting what matters most. But for those looking closely at their homeowners’ insurance, these improvements may also offer a practical path to lower premiums and better long-term coverage.

At Kingdom Roofing Systems, we help Indiana families take a strategic approach—one that strengthens their home’s resilience while aligning with what many insurance providers look for in safer, code-compliant properties.

Below, we’ll explore how specific exterior upgrades can reduce risk, improve eligibility for discounts, and support more affordable insurance protection.

Key Takeaways

  • Exterior remodeling offers Indiana homeowners a way to reduce insurance costs through safer materials and better home protection.

  • Common upgrades like roofing, siding, and gutters help lower risk and improve how insurance providers assess your property.

  • Strong documentation and code-compliant improvements support smoother reassessments and may qualify you for more insurance coverage.

  • Extra steps like reviewing policies and adding business coverage ensure your home stays protected during and after remodeling.

How Exterior Remodeling Might Help You Save on Home Insurance

Smart exterior remodeling can do more than protect your home. It may also help lower your insurance costs. Here’s how it can support stronger protection and more affordable premiums:

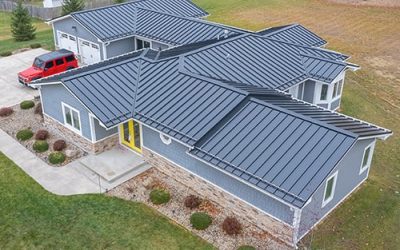
Replacing Outdated Roofing to Meet Current Building Codes

Many homes in Indianapolis still have roofing systems that predate current building codes, leaving them vulnerable to weather damage and higher homeowners’ insurance rates. Updating it with impact-resistant materials provides not just structural protection but also home improvement insurance benefits.

Insurers often reward these significant improvements with lower home insurance premiums, especially when backed by certified inspections.

If your home sustains extensive fire damage, having newer roofing in place can also lead to better dwelling coverage in a roof replacement scenario.

Upgrading to Fiber Cement Siding for Fire and Impact Resistance

James Hardie siding is one of the most exciting home improvement materials for Indiana homeowners because of its fire resistance and durability.

Making this home renovation upgrade may increase your home’s value, reduce the potential for property damage, and make it easier to find home insurance coverage that offers sufficient coverage for your needs.

For would-be buyers, it also adds curb appeal and peace of mind, both of which can positively influence your homeowners’ policy options.

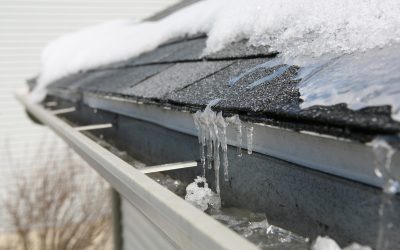
Installing Seamless Gutters to Prevent Foundation Damage

Properly installed seamless gutters help preserve your home’s floor plan and prevent costly foundation repairs tied to water intrusion. Water damage not only raises the cost of future homeowners’ insurance premiums but may also reduce the value of your home.

With fewer drainage issues, you can benefit from insurance discount opportunities and avoid exhausting your existing coverage limits.

In Marion County, where freeze-thaw cycles are common, insurance providers often factor gutter systems into their insurance reassessment process after remodels.

Adding Security Systems with Automatic Alerts

Adding security systems that integrate with your phone and automatically alert the police can significantly reduce your liability risk.

Many insurers in the insurance industry recognize homes with local alarm systems, cameras, and monitored sprinkler home security discounts as lower risk. These improvements can reduce your homeowners’ insurance premium while offering the same protection as higher-cost properties.

Whether you’re working with your insurance company or comparing options from more insurance carriers, enhanced security lowers your risk profile.

Increasing Square Footage with Code-Compliant Additions

Adding more livable square footage for an expanding family boosts your home’s market value, but it also requires updating your existing homeowners’ policy.

Ensuring the addition is built to code and professionally inspected opens the door for home improvement projects to result in better insurance features.

It’s common to see more coverage added through a policy upgrade, especially when your remodel includes new wiring, plumbing, or ventilation systems—all tied to improved financial protection in a disastrous event.

How to Remodel the Exterior Strategically to Lower Your Home Insurance

Remodeling your home’s exterior offers an opportunity to improve how your home is viewed by your insurance provider. When done right, these upgrades can support lasting coverage.

Here’s how to remodel with both safety and savings in mind:

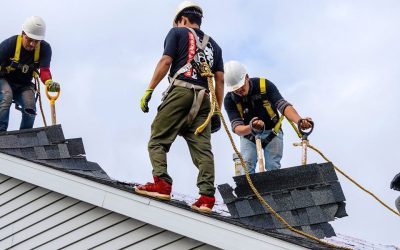
Prioritize High-Risk System Updates First

Updating your roof, siding, or gutters doesn’t just improve aesthetics. It reduces your liability and appeals to your insurance carrier.

Many clients ask, “Does home remodeling lower insurance costs?

In our experience, yes, when focused on key risk areas like storm damage and drainage. This is especially true in areas where weather damage is common and claims history can impact your home insurance status.

Choose Products Recognized by the Insurance Industry

We work with materials proven to reduce claims, including those supported by leading carriers in the insurance industry.

When choosing remodeling materials, opt for those that support better insurance coverage or qualify for discounts on contractors’ insurance documentation. These decisions streamline claims and make it easier to provide coverage that reflects your home’s true resilience.

Document Every Renovation for Post-Project Reassessment

Detailed records, including invoices and before-and-after photos, support post-renovation valuation and guide your insurance reassessment. This is especially important if you’re trying to compare home insurance quotes or evaluate how much coverage you need.

Every change to the square footage or safety profile can affect your existing policy, including whether you need vacant home insurance during construction.

Add Mitigation Measures That Reduce Disaster Losses

Including special loss mitigation measures like fire-rated attic insulation, soffit venting, or Class 4 impact-resistant asphalt shingles lowers your exposure to business risk and property damage.

These updates may also influence how your homeowners’ insurance handles claims following storms or fire. They’re especially relevant in areas near wooded zones where risk exposure is higher.

Ask About Additional Policy Types if You Run a Home-Based Business

Operating a home business, working remotely, or storing business-related assets can complicate your home insurance coverage.

In such cases, your insurance agent may recommend a separate policy designed specifically for in-home business insurance or a separate home business policy.

This ensures business property included in your home’s structure is accounted for, minimizing gaps in personal property protection.

Coordinate with Your Contractor for Builders’ Risk Insurance

For large remodels, especially those involving roof tear-offs or full siding replacement, a builder’s risk insurance policy may be required. This temporary coverage protects your structure while it’s under construction, and it’s crucial when portions of your home are exposed.

At Kingdom Roofing Systems, we collaborate with your insurance provider to confirm that your liability coverage and dwelling coverage aren’t compromised during the upgrade.

Ask Your Agent to Compare Home Insurance Quotes After Renovations

After completing your project, review your existing policy with an agent and explore options through more insurance carriers. Ask how each option handles your current building codes, recent significant improvements like a new fiber cement siding, and any new insurance features you’ve added.

Even your central dispatch team for alarm monitoring can be a variable in final pricing, and your umbrella insurance policy may need adjustment depending on your updated risk profile.

Ready to reduce insurance costs while upgrading your home?

Contact us at (317) 674-4900 or (765) 573-5899 for a free roof inspection and tailored remodel plan that supports both safety and savings.

Frequently Asked Questions

Does home remodeling lower insurance if the project only involves updating windows or doors?

Cosmetic updates like windows or doors rarely lower insurance costs. Insurers value functional improvements, such as updating wiring, replacing pipes, or installing more modern plumbing hardware that reduces potential water or fire risks.

Will my insurance company raise dwelling coverage automatically after a significant home renovation?

Your insurance company will not increase dwelling coverage without documentation. Request a reassessment to avoid exceeding your existing limit and stay fully protected.

Does homeowners’ insurance provide coverage for issues caused by outdated wiring or plumbing systems during construction?

Homeowners’ insurance may exclude claims related to old wiring or plumbing systems. Upgrade to standards that mean insurance companies consider safe before starting work.

Can homeowners’ insurance discounts apply if my new security system automatically alerts police during emergencies?

Yes. A system that automatically alerts police lowers risk and may reduce premiums if a disastrous event occurs during your coverage period.


Let Kingdom Roofing Systems help you choose the right siding.

Can Exterior Remodels Help Indianapolis Homeowners Lower Insurance Costs?

Oct 27, 2025 | Maintenance

Dealing with moss on your roof in Indiana? Removing it promptly is essential to prevent damage. Hiring a professional roof inspector for thorough evaluations is crucial to ensure your roof’s condition is properly assessed. If left unattended, moss can trap moisture, leading to structural issues such as loosened shingles, roof leaks, and the growth of damaging organisms like mold and algae. This guide shows you how to get moss off your roof in Indiana effectively and keep it off for good.

Key Takeaways

  • Moss retention on roofs can lead to moisture issues, damaging shingles and compromising the roof’s structural integrity, making early identification and removal essential.
  • The best time to remove moss in Indiana is during spring and summer when growth is easier to manage due to warmer and dryer conditions.
  • Regular maintenance by a roofing contractor, including debris clearance and the installation of prevention measures like zinc strips, is key to preventing future moss growth and ensuring roof longevity.

Why Moss is a Problem for Your Roof

Neglecting the presence of moss might seem inconsequential, yet if not managed, it can inflict considerable harm on your roof. Moss’s propensity to hold onto moisture when in contact with roofing materials is particularly problematic, as it prompts the deterioration of shingles and fosters wood rot over time. This trapped moisture accelerates the degradation process for roofing materials and can threaten the structural soundness of your roof, leading to expensive repair work. As this cycle progresses, moss proliferates, compounding these issues.

The expansion of moss has another detrimental effect. It can pry apart shingles thereby paving avenues through which water may infiltrate causing leaks and additional damage. Its weight adds undue strain to a roof structure that could yield lasting damage if left unchecked. Early detection and remediation are critical in avoiding grave consequences like extensive damages or costly repairs—particularly pertinent when asphalt shingles come into play. A home inspector can identify moss issues during a general assessment, but a dedicated roofing contractor might be necessary for a specialized focus. Additionally, inspecting attics for signs of moss-related damage, such as water stains and wood rot, is crucial.

To overlook moss accumulation spells potential trouble for any rooftop. Conducting regular inspections focused on detecting early signs of growth plays an essential role in preemptively dealing with these threats before they escalate beyond control—a strategy pivotal for circumventing future proliferation that leads to problems down the line while ensuring one’s roof remains intact thus bypassing comprehensive repairs or total replacement woes. Knowing your roof’s condition through these inspections provides crucial insights for budgeting and planning future repairs.

Identifying Moss on Your Roof

To tackle the issue effectively, it’s essential to spot any moss present on your roofing. Moss commonly forms in lush green clumps and favors the shaded, moist spots atop your roof. In contrast to algae that manifests as slick dark lines, roof moss presents itself as soft, dense vegetation frequently nestled into shingle gaps.

It is imperative to perform a thorough inspection of the roof to detect early signs of moss and stave off additional harm. Regular inspections should specifically search for evidence of this growth so that you can address it swiftly. Early detection allows you to implement measures for eradicating the moss and safeguarding your roof’s structure during a home inspection. This may also entail enlisting expertise from a roofing professional to conduct a thorough roof inspection and provide a detailed assessment.

Best Time to Remove Moss in Indiana

The timing of moss removal is essential for its success. In Indiana, the prime seasons to tackle removing moss are spring and summer, with warm and dry climates being ideal. The summer period offers a particular benefit as during this time, moss often enters a dormant state and adheres less firmly to roof shingles, thus simplifying the scraping process.

It’s preferable to undertake moss removal when the weather forecast predicts clear skies since this assists in thoroughly drying out any clean moss remnants, facilitating their complete eradication. Wet conditions can make moss removal more challenging as moss holds moisture against shingles, promoting the growth of damaging organisms and creating slippery conditions.

Selecting just the right moment for eliminating moss plays an instrumental role in sustaining a tidy appearance for your roof—a key factor that contributes substantially to both its durability and overall condition. Engaging a professional roofing contractor can further enhance the effectiveness of moss removal. These experts conduct thorough assessments and provide critical insights into repairs and specialized services, ensuring that your roof remains in optimal condition.

Step-by-Step Guide to Removing Moss for Professionals

The task of moss removal from your roof should ideally be undertaken by a trusted roofing company, particularly when the extent of moss growth is significant. Initially, it’s crucial to evaluate how severe the moss accumulation is on the roof to decide upon an effective method for its eradication. Techniques such as manual scraping, water washing, and chemical applications are commonly employed pressure washing methods for eliminating moss. If the moss damage is extensive, it may necessitate a roof replacement to ensure long-term durability and property value.

Should you feel uneasy about carrying out this process yourself, it’s wise to engage a professional roof cleaning service to guarantee that the job is conducted safely and with precision. Subsequent sections delve into vital preparatory steps required before initiating moss removal on your roof, various hands-on techniques used in manually removing moss, and instructions for applying chemicals designed specifically as a moss killer solution.

Preparing the Roof for Moss Removal

Before initiating the process of moss removal from your roof, it’s essential to adequately prepare the area. Ensure you prioritize safety precautions by utilizing a sturdy ladder equipped with anti-slip features and wearing footwear that offers good traction to mitigate the risk of falling. It is also advisable to wear protective gloves and eyewear for personal protection while removing the moss.

To safeguard your garden or surrounding plants during cleaning, either shield them using plastic tarps or apply a mixture of watered-down dish soap. This will help prevent any harm that might arise from contact with cleaning agents. When ready to begin spraying your roof, do so starting at its peak and working downward. Using the right tools, such as a high-quality sprayer and appropriate cleaning solutions, helps in preserving the integrity of the moss until you commence manual removal, thereby simplifying this part of the task.

Manual Moss Removal Techniques for Professionals

Using appropriate tools is crucial for the manual removal of moss, which includes using brooms and roof rakes specifically designed for this task. For effectively scrubbing moss from your roof without inflicting damage, a stiff brush proves to be an excellent tool. Employing a long-handled brush can enhance safety and efficiency when clearing moss off elevated roofing areas. Professional roofers are often recommended for this task due to their expertise and adherence to safety procedures.

When attempting to clean the moss from your roof tiles, it’s advisable to start at the top and work your way down in order to prevent water infiltration that could lead to leaks. Before beginning the cleaning process with gentle strokes, moisten the targeted sections with water using a garden hose. This will facilitate easier removal of the moss without having to apply excessive force that might harm the shingles. Using gentle techniques is essential to avoid damaging the roofing materials.

The process of manually removing debris may require considerable effort, but remains effective against small cracks if executed cautiously. This meticulous approach serves as an adequate alternative method where cracked methods fail or are not suitable.

Applying Moss Killer Solutions

Utilizing moss killer formulations guarantees the thorough elimination of moss while also deterring its recurrence. Potent cleaning concoctions, like a diluted mixture of bleach and water, are adept at exterminating present moss and thwarting new growth. For effective moss eradication, it is essential to use a moss remover, as it ensures the proper timing and application needed to maximize results. For optimal efficacy, let these mixtures dwell on the affected areas for no less than 20 minutes before washing it off.

It’s crucial to adopt eco-conscious approaches when combating moss to preserve adjacent ecosystems. Administer the anti-moss solution in a descending manner by employing either a spray bottle or pump sprayer. This ensures uniform application and boosts the efficiency of your efforts as you work towards removing moss from surfaces. After applying the solution, addressing the remaining moss is important. Gently wipe off this residual moss using a soft-bristle brush or cloth as part of the final cleanup to ensure a thorough cleaning.

Post-Removal Cleanup

After eliminating the moss, it is essential to engage in an exhaustive cleaning of the removed area. Employ low-pressure water to cleanse the roof and remove any particles of moss that may still be present, thus securing a spotless surface. It’s also crucial to clear away any leftover residue or debris from gutters and downspouts using pressure washing. This action helps avoid blockages that could lead to water damage. Additionally, ensure that all dead moss is completely removed, as it can still retain moisture and cause potential damage.

Subsequent to rinsing off the roof, conduct a detailed inspection for areas where moss might have been overlooked so as to ensure its complete removal. Implementing these measures safeguards your roof’s integrity and deters growth of moss. Regular roofing inspections are also vital after moss removal to maintain the structural integrity and longevity of your roof.

Preventing Future Moss Growth

Preventing future moss growth requires regular roof maintenance and proactive measures to prevent future growth. Here are some steps to consider.

  1. Clear debris and moss remnants from the roof to prevent clogging of gutters and drainage systems.
  2. Regularly clean gutters to ensure proper water flow.
  3. Trim overhanging trees to reduce moisture buildup on your roof, which in turn limits moss growth.

By following these steps, you can effectively manage and prevent moss growth on your roof to rid it of various elements.

Several preventive measures can inhibit moss and algae growth on your roof. Zinc or copper strips can effectively prevent moss growth by creating a hostile environment for moss and algae. Using algae-resistant roofing shingles can also prevent moss growth in humid and damp areas.

By implementing these preventative measures, you can keep your roofs free from unsightly stains and potential water damage. Regular maintenance and proactive steps will help ensure your new roof remains in top condition for years to come and prevent future growth of moss and algae.

When to Call Professional Roofing Contractors

In cases where homeowners are equipped to tackle moss removal by themselves, it might still be advisable to engage expert roofing professionals for the task. This is particularly true when dealing with widespread moss overgrowth on a roof that can be dangerous due to its slippery nature and steep angles. Trained professionals bring specialized equipment and expertise essential for safely conducting these operations while avoiding any additional harm.

Such specialists deliver comprehensive services beyond just eradicating moss—they also handle gutter cleaning, which is instrumental in deterring new accumulations of moss. They apply methods in their roof cleaning processes that are not only effective but also gentle on the environment, ensuring protection for both your home’s top layer and the natural setting around it. Opting for a professional in roofing guarantees meticulous inspections as well as regular upkeep activities designed to extend your roof’s lifespan. Certified home inspectors contribute crucial assessments regarding your roof’s overall state—including determining if there’s an impending necessity for its replacement. Careful handling during these tasks is crucial to avoid causing damage, especially when removing moss or inspecting shingles.

Cost Implications of Moss Removal

Comprehending the financial aspects of moss removal is crucial for planning your maintenance budget. The cost to clean a roof typically varies from $0.20 to $0.35 per square foot, with factors like the degree of moss growth and chosen cleaning techniques influencing the price. For an average-sized roof encompassing 1,500 square feet, you might expect to spend between $300 and $525 on cleaning services. Meanwhile, for larger roofs around 2,000 square feet in size, the standard cost hovers near $440. Addressing potential problems through moss removal is essential to avoid costly repairs and ensure the longevity of your roofing system.

In terms of prevention strategies such as implementing zinc strips on your roof, you can incur expenses ranging from $25 to $50 per 50-foot roll. While this outlay may appear substantial at first glance, it’s considered a sound investment that serves not only to dodge exorbitant future repair bills, but also extends the overall durability of your roofing system. The timing and quality of these preventative measures can make all the difference in achieving effective long-term results and preventing future issues.

Summary

In conclusion, moss removal is a critical aspect of roof maintenance that should not be overlooked. Moss can cause significant damage to your roof, leading to potential leaks and structural issues if left untreated. Maintaining the roof’s integrity by identifying moss early, removing it effectively, and taking preventive measures can help avoid costly repairs and ensure the overall health of your building.

By understanding the best times for moss removal, the steps involved in the process, and when to call professional roofing contractors, you can ensure your roof remains in top condition. Investing in regular maintenance and proactive measures will pay off in the long run, keeping your roof moss-free, enhancing its curb appeal, and extending its lifespan.

Frequently Asked Questions

What are the signs of moss growth on my roof?

Signs of moss growth on your roof include large clumps of moss and dark stains, which can indicate the presence of algae. These are often found in shaded and damp areas or in the cracks and crevices of shingles.

Addressing these issues promptly can help maintain the integrity of your roof.

When is the best time to remove moss from my roof in Indiana?

The best time to remove moss from your roof in Indiana is during spring or summer, as moss continues to grow and retain moisture, leading to significant problems for roofing materials. The warm and dry weather during these seasons enhances the effectiveness of the removal process.

Can I remove moss from my roof myself?

You can remove moss from your roof yourself, but it’s advisable to conduct a roof inspection before attempting DIY moss removal to ensure the roof’s health and identify any underlying issues.

Additionally, avoid using a pressure washer for moss removal, as it can damage roofing materials and merely dislodge the moss rather than completely eliminate it.

How much does it cost to remove moss from a roof?

Removing moss from a roof generally costs between $0.20 and $0.35 per square foot, amounting to approximately $300 to $525 for an average 1,500 square foot roof. Additionally, incorporating roofing inspections into your maintenance routine can help identify potential issues early, ensuring the structural integrity and longevity of your roof.

What preventive measures can I take to avoid future moss growth?

To effectively prevent future moss growth, seek qualified inspectors through the International Association of Certified Home Inspectors® (NACHI) to ensure your roof is properly maintained. Regularly clean your gutters, trim overhanging trees, install zinc or copper strips, and consider using algae-resistant shingles for the protection and longevity of your house.

These measures will significantly reduce the conditions that foster moss growth.

Related Posts