How to Remove an Ice Dam

Oct 18, 2023 | Winterizing

Winter can be a picturesque season, with snow-covered landscapes and frosty trees. However, for homeowners and business owners, it also brings the potential headache of ice dams. Let’s look at what an ice dam is, the damage it can cause to residential and commercial roofs, and how to fix and remove an ice dam from your roof.

What is an Ice Dam?

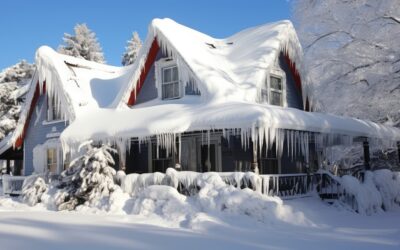
An ice dam is a ridge of ice that forms along the eaves of a roof or in your gutters, typically during the winter months. It occurs when the heat from your home or business escapes through the roof and melts the snow on the upper part of your roof. 

As this melted water flows down the roof, it can refreeze when it reaches the colder eaves, creating a dam of ice. Over time, this dam can grow larger and block the natural drainage of water from the roof.

Damage to Residential Roofs

Ice dams can wreak havoc on residential roofs. The most immediate concern is the added weight they place on your roof. The excess weight of the ice and snow can lead to structural damage, causing sagging or even collapse in extreme cases. 

Additionally, as the ice dam blocks the natural flow of water off the roof, it can force water under your shingles or through cracks in the roof, leading to leaks and water damage inside your home. This can result in damaged ceilings, walls, insulation, and even electrical systems.

Moisture trapped beneath the ice dam can also contribute to the growth of mold and mildew, creating an unhealthy indoor environment. This not only poses health risks to residents but also necessitates costly repairs. The aesthetic appeal of your home can also suffer, as water stains on walls and ceilings can be challenging to fix.

Damage to Commercial Roofs

Commercial properties are not immune to the dangers posed by ice dams. In fact, the damage can be even more severe due to the typically larger size of commercial roofs. Similar to residential roofs, the weight of the ice dam can stress the structure, potentially leading to significant damage. 

Additionally, water infiltration through the roof can cause floods, damage inventory, equipment, and interior finishes, resulting in costly repairs and business interruptions.

Commercial properties often have flat or low-slope roofs, which are more susceptible to ice dam formation. These roofs tend to accumulate water on the surface, which, when frozen, can exacerbate the problem. The damage caused by ice dams can impact not only the roof but also the overall integrity of the building.

How to Fix an Ice Dam

If you’re faced with an ice dam, it’s essential to address it promptly to prevent further damage. Here are steps you can take if you need to know how to remove an ice dam from your roof:

Safety First

Ensure your safety by using appropriate equipment, such as safety harnesses, and work with a partner if possible.

Remove Snow

Safely remove snow from your roof using a roof rake or a long-handled broom. This will help reduce the source of melting water.

Break the Ice Dam

Gently break the ice dam using a blunt tool or ice melt products specifically designed for roofs. Do not use sharp objects or excessive force, as this can damage your roof.

Clear Gutters and Downspouts

Ensure that your gutters and downspouts are clear of ice and debris to allow for proper drainage.

Insulate and Ventilate

Long-term prevention involves improving your roof’s insulation and ventilation to minimize heat loss.

Professional Help

If the ice dam is extensive or if you’re uncomfortable with the removal process, consider hiring a professional roofing contractor with experience in ice dam removal.

Take Ice Dams Seriously

Ice dams can cause significant damage to both residential and commercial roofs, leading to costly repairs and potential safety hazards. Addressing ice dams promptly is crucial to minimizing these risks. While you can take some steps to remove an ice dam yourself, it’s often best to seek professional help to ensure the job is done safely and effectively.

Call In The Pros

Kingdom Roofing Systems, a full-service commercial and residential roofing contractor in Indiana, is qualified to handle any and all roofing concerns, including ice dams. With our expertise, you can safeguard your property against the damaging effects of ice dams and enjoy peace of mind during the winter months. 

Don’t let ice dams compromise the integrity of your roof—reach out to Kingdom Roofing Systems for professional help today.


Do you have an ice dam that needs removing?

Address your roofing concerns with confidence by entrusting them to Kingdom Roofing Systems. Connect with us now for expert solutions that safeguard your home in any climate, ensuring your roof’s durability while delivering cost savings and ultimate peace of mind.

How to Remove an Ice Dam

Oct 18, 2023 | Winterizing

Dealing with moss on your roof in Indiana? Removing it promptly is essential to prevent damage. Hiring a professional roof inspector for thorough evaluations is crucial to ensure your roof’s condition is properly assessed. If left unattended, moss can trap moisture, leading to structural issues such as loosened shingles, roof leaks, and the growth of damaging organisms like mold and algae. This guide shows you how to get moss off your roof in Indiana effectively and keep it off for good.

Key Takeaways

  • Moss retention on roofs can lead to moisture issues, damaging shingles and compromising the roof’s structural integrity, making early identification and removal essential.
  • The best time to remove moss in Indiana is during spring and summer when growth is easier to manage due to warmer and dryer conditions.
  • Regular maintenance by a roofing contractor, including debris clearance and the installation of prevention measures like zinc strips, is key to preventing future moss growth and ensuring roof longevity.

Why Moss is a Problem for Your Roof

Neglecting the presence of moss might seem inconsequential, yet if not managed, it can inflict considerable harm on your roof. Moss’s propensity to hold onto moisture when in contact with roofing materials is particularly problematic, as it prompts the deterioration of shingles and fosters wood rot over time. This trapped moisture accelerates the degradation process for roofing materials and can threaten the structural soundness of your roof, leading to expensive repair work. As this cycle progresses, moss proliferates, compounding these issues.

The expansion of moss has another detrimental effect. It can pry apart shingles thereby paving avenues through which water may infiltrate causing leaks and additional damage. Its weight adds undue strain to a roof structure that could yield lasting damage if left unchecked. Early detection and remediation are critical in avoiding grave consequences like extensive damages or costly repairs—particularly pertinent when asphalt shingles come into play. A home inspector can identify moss issues during a general assessment, but a dedicated roofing contractor might be necessary for a specialized focus. Additionally, inspecting attics for signs of moss-related damage, such as water stains and wood rot, is crucial.

To overlook moss accumulation spells potential trouble for any rooftop. Conducting regular inspections focused on detecting early signs of growth plays an essential role in preemptively dealing with these threats before they escalate beyond control—a strategy pivotal for circumventing future proliferation that leads to problems down the line while ensuring one’s roof remains intact thus bypassing comprehensive repairs or total replacement woes. Knowing your roof’s condition through these inspections provides crucial insights for budgeting and planning future repairs.

Identifying Moss on Your Roof

To tackle the issue effectively, it’s essential to spot any moss present on your roofing. Moss commonly forms in lush green clumps and favors the shaded, moist spots atop your roof. In contrast to algae that manifests as slick dark lines, roof moss presents itself as soft, dense vegetation frequently nestled into shingle gaps.

It is imperative to perform a thorough inspection of the roof to detect early signs of moss and stave off additional harm. Regular inspections should specifically search for evidence of this growth so that you can address it swiftly. Early detection allows you to implement measures for eradicating the moss and safeguarding your roof’s structure during a home inspection. This may also entail enlisting expertise from a roofing professional to conduct a thorough roof inspection and provide a detailed assessment.

Best Time to Remove Moss in Indiana

The timing of moss removal is essential for its success. In Indiana, the prime seasons to tackle removing moss are spring and summer, with warm and dry climates being ideal. The summer period offers a particular benefit as during this time, moss often enters a dormant state and adheres less firmly to roof shingles, thus simplifying the scraping process.

It’s preferable to undertake moss removal when the weather forecast predicts clear skies since this assists in thoroughly drying out any clean moss remnants, facilitating their complete eradication. Wet conditions can make moss removal more challenging as moss holds moisture against shingles, promoting the growth of damaging organisms and creating slippery conditions.

Selecting just the right moment for eliminating moss plays an instrumental role in sustaining a tidy appearance for your roof—a key factor that contributes substantially to both its durability and overall condition. Engaging a professional roofing contractor can further enhance the effectiveness of moss removal. These experts conduct thorough assessments and provide critical insights into repairs and specialized services, ensuring that your roof remains in optimal condition.

Step-by-Step Guide to Removing Moss for Professionals

The task of moss removal from your roof should ideally be undertaken by a trusted roofing company, particularly when the extent of moss growth is significant. Initially, it’s crucial to evaluate how severe the moss accumulation is on the roof to decide upon an effective method for its eradication. Techniques such as manual scraping, water washing, and chemical applications are commonly employed pressure washing methods for eliminating moss. If the moss damage is extensive, it may necessitate a roof replacement to ensure long-term durability and property value.

Should you feel uneasy about carrying out this process yourself, it’s wise to engage a professional roof cleaning service to guarantee that the job is conducted safely and with precision. Subsequent sections delve into vital preparatory steps required before initiating moss removal on your roof, various hands-on techniques used in manually removing moss, and instructions for applying chemicals designed specifically as a moss killer solution.

Preparing the Roof for Moss Removal

Before initiating the process of moss removal from your roof, it’s essential to adequately prepare the area. Ensure you prioritize safety precautions by utilizing a sturdy ladder equipped with anti-slip features and wearing footwear that offers good traction to mitigate the risk of falling. It is also advisable to wear protective gloves and eyewear for personal protection while removing the moss.

To safeguard your garden or surrounding plants during cleaning, either shield them using plastic tarps or apply a mixture of watered-down dish soap. This will help prevent any harm that might arise from contact with cleaning agents. When ready to begin spraying your roof, do so starting at its peak and working downward. Using the right tools, such as a high-quality sprayer and appropriate cleaning solutions, helps in preserving the integrity of the moss until you commence manual removal, thereby simplifying this part of the task.

Manual Moss Removal Techniques for Professionals

Using appropriate tools is crucial for the manual removal of moss, which includes using brooms and roof rakes specifically designed for this task. For effectively scrubbing moss from your roof without inflicting damage, a stiff brush proves to be an excellent tool. Employing a long-handled brush can enhance safety and efficiency when clearing moss off elevated roofing areas. Professional roofers are often recommended for this task due to their expertise and adherence to safety procedures.

When attempting to clean the moss from your roof tiles, it’s advisable to start at the top and work your way down in order to prevent water infiltration that could lead to leaks. Before beginning the cleaning process with gentle strokes, moisten the targeted sections with water using a garden hose. This will facilitate easier removal of the moss without having to apply excessive force that might harm the shingles. Using gentle techniques is essential to avoid damaging the roofing materials.

The process of manually removing debris may require considerable effort, but remains effective against small cracks if executed cautiously. This meticulous approach serves as an adequate alternative method where cracked methods fail or are not suitable.

Applying Moss Killer Solutions

Utilizing moss killer formulations guarantees the thorough elimination of moss while also deterring its recurrence. Potent cleaning concoctions, like a diluted mixture of bleach and water, are adept at exterminating present moss and thwarting new growth. For effective moss eradication, it is essential to use a moss remover, as it ensures the proper timing and application needed to maximize results. For optimal efficacy, let these mixtures dwell on the affected areas for no less than 20 minutes before washing it off.

It’s crucial to adopt eco-conscious approaches when combating moss to preserve adjacent ecosystems. Administer the anti-moss solution in a descending manner by employing either a spray bottle or pump sprayer. This ensures uniform application and boosts the efficiency of your efforts as you work towards removing moss from surfaces. After applying the solution, addressing the remaining moss is important. Gently wipe off this residual moss using a soft-bristle brush or cloth as part of the final cleanup to ensure a thorough cleaning.

Post-Removal Cleanup

After eliminating the moss, it is essential to engage in an exhaustive cleaning of the removed area. Employ low-pressure water to cleanse the roof and remove any particles of moss that may still be present, thus securing a spotless surface. It’s also crucial to clear away any leftover residue or debris from gutters and downspouts using pressure washing. This action helps avoid blockages that could lead to water damage. Additionally, ensure that all dead moss is completely removed, as it can still retain moisture and cause potential damage.

Subsequent to rinsing off the roof, conduct a detailed inspection for areas where moss might have been overlooked so as to ensure its complete removal. Implementing these measures safeguards your roof’s integrity and deters growth of moss. Regular roofing inspections are also vital after moss removal to maintain the structural integrity and longevity of your roof.

Preventing Future Moss Growth

Preventing future moss growth requires regular roof maintenance and proactive measures to prevent future growth. Here are some steps to consider.

  1. Clear debris and moss remnants from the roof to prevent clogging of gutters and drainage systems.
  2. Regularly clean gutters to ensure proper water flow.
  3. Trim overhanging trees to reduce moisture buildup on your roof, which in turn limits moss growth.

By following these steps, you can effectively manage and prevent moss growth on your roof to rid it of various elements.

Several preventive measures can inhibit moss and algae growth on your roof. Zinc or copper strips can effectively prevent moss growth by creating a hostile environment for moss and algae. Using algae-resistant roofing shingles can also prevent moss growth in humid and damp areas.

By implementing these preventative measures, you can keep your roofs free from unsightly stains and potential water damage. Regular maintenance and proactive steps will help ensure your new roof remains in top condition for years to come and prevent future growth of moss and algae.

When to Call Professional Roofing Contractors

In cases where homeowners are equipped to tackle moss removal by themselves, it might still be advisable to engage expert roofing professionals for the task. This is particularly true when dealing with widespread moss overgrowth on a roof that can be dangerous due to its slippery nature and steep angles. Trained professionals bring specialized equipment and expertise essential for safely conducting these operations while avoiding any additional harm.

Such specialists deliver comprehensive services beyond just eradicating moss—they also handle gutter cleaning, which is instrumental in deterring new accumulations of moss. They apply methods in their roof cleaning processes that are not only effective but also gentle on the environment, ensuring protection for both your home’s top layer and the natural setting around it. Opting for a professional in roofing guarantees meticulous inspections as well as regular upkeep activities designed to extend your roof’s lifespan. Certified home inspectors contribute crucial assessments regarding your roof’s overall state—including determining if there’s an impending necessity for its replacement. Careful handling during these tasks is crucial to avoid causing damage, especially when removing moss or inspecting shingles.

Cost Implications of Moss Removal

Comprehending the financial aspects of moss removal is crucial for planning your maintenance budget. The cost to clean a roof typically varies from $0.20 to $0.35 per square foot, with factors like the degree of moss growth and chosen cleaning techniques influencing the price. For an average-sized roof encompassing 1,500 square feet, you might expect to spend between $300 and $525 on cleaning services. Meanwhile, for larger roofs around 2,000 square feet in size, the standard cost hovers near $440. Addressing potential problems through moss removal is essential to avoid costly repairs and ensure the longevity of your roofing system.

In terms of prevention strategies such as implementing zinc strips on your roof, you can incur expenses ranging from $25 to $50 per 50-foot roll. While this outlay may appear substantial at first glance, it’s considered a sound investment that serves not only to dodge exorbitant future repair bills, but also extends the overall durability of your roofing system. The timing and quality of these preventative measures can make all the difference in achieving effective long-term results and preventing future issues.

Summary

In conclusion, moss removal is a critical aspect of roof maintenance that should not be overlooked. Moss can cause significant damage to your roof, leading to potential leaks and structural issues if left untreated. Maintaining the roof’s integrity by identifying moss early, removing it effectively, and taking preventive measures can help avoid costly repairs and ensure the overall health of your building.

By understanding the best times for moss removal, the steps involved in the process, and when to call professional roofing contractors, you can ensure your roof remains in top condition. Investing in regular maintenance and proactive measures will pay off in the long run, keeping your roof moss-free, enhancing its curb appeal, and extending its lifespan.

Frequently Asked Questions

What are the signs of moss growth on my roof?

Signs of moss growth on your roof include large clumps of moss and dark stains, which can indicate the presence of algae. These are often found in shaded and damp areas or in the cracks and crevices of shingles.

Addressing these issues promptly can help maintain the integrity of your roof.

When is the best time to remove moss from my roof in Indiana?

The best time to remove moss from your roof in Indiana is during spring or summer, as moss continues to grow and retain moisture, leading to significant problems for roofing materials. The warm and dry weather during these seasons enhances the effectiveness of the removal process.

Can I remove moss from my roof myself?

You can remove moss from your roof yourself, but it’s advisable to conduct a roof inspection before attempting DIY moss removal to ensure the roof’s health and identify any underlying issues.

Additionally, avoid using a pressure washer for moss removal, as it can damage roofing materials and merely dislodge the moss rather than completely eliminate it.

How much does it cost to remove moss from a roof?

Removing moss from a roof generally costs between $0.20 and $0.35 per square foot, amounting to approximately $300 to $525 for an average 1,500 square foot roof. Additionally, incorporating roofing inspections into your maintenance routine can help identify potential issues early, ensuring the structural integrity and longevity of your roof.

What preventive measures can I take to avoid future moss growth?

To effectively prevent future moss growth, seek qualified inspectors through the International Association of Certified Home Inspectors® (NACHI) to ensure your roof is properly maintained. Regularly clean your gutters, trim overhanging trees, install zinc or copper strips, and consider using algae-resistant shingles for the protection and longevity of your house.

These measures will significantly reduce the conditions that foster moss growth.

Related Posts

New Homeowner’s Guide to Winterizing

New Homeowner’s Guide to Winterizing

Water is, by far, the main concern in home maintenance. Every fall Kingdom Roofing Systems recommends having a professional inspect the roof. A little preventative maintenance can save thousands of dollars in repairs inside and outside.

read more